This slideshow works great on any screen size; it can also be used on different layouts. On my homepage I used it on a layout with sidebar on the left side.
HTML content block
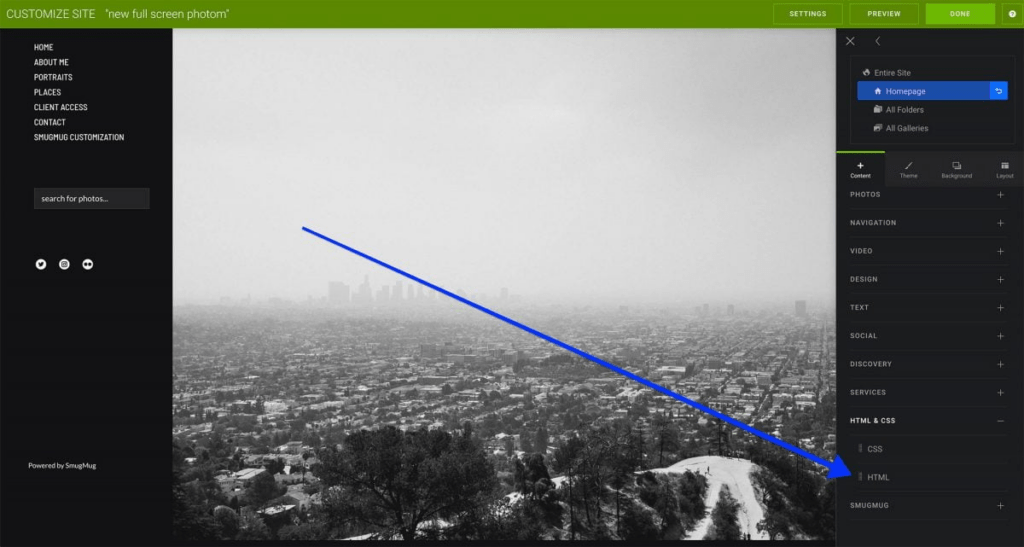
Add a HTML content block to the page, where you would like the slideshow to appear. In my case I have added it to my homepage. The HTML content block can be found here { see my screenshot }:

The HTML content block contains two tabs – HTML and CSS code. In this part we will focus on the HTML code. In this code we will specify which photos we would like to show in the slideshow. Horizontal images work best in this slideshow.
<!-- container -->
<div class="container">
    <div class="progress-bar"></div>
    <!-- slides -->
    <div class="slides">

      <div class="slide" style="background-image: url(https://photos.smugmug.com/Personal/Leicestershire/i-PjNdtzX/0/8b39779a/X4/leicester-lights-2020_29-X4.jpg);">
      </div>

      <div class="slide" style="background-image: url(https://photos.smugmug.com/Personal/USA/i-R5df7KQ/7/5d647a98/4K/grand-canyon-sunrise-4K.jpg);">
      </div>

      <div class="slide" style="background-image: url(https://photos.smugmug.com/Personal/USA/i-j2xgVgP/7/2237952f/4K/the-beginning-4K.jpg);">
      </div>

      <div class="slide" style="background-image: url(https://photos.smugmug.com/Personal/USA/i-mnmqgCV/4/44187045/4K/_DSC4945-4K.jpg);">
      </div>

      <div class="slide" style="background-image: url(https://photos.smugmug.com/Personal/USA/i-JFmTZTw/1/896059a4/4K/_DSF4877-4K.jpg);">
      </div>
    </div>
    <!--/ slides /-->

</div>
<!--/ container /-->
You will need to replace the image links between brackets () with links to your own images. You do not want to show my photos in your slideshow :p
As you can see – I have used only 5 photos – in my opinion, this is a sweet spot between good slideshow performance and loading time. You can remove one of these lines or add one more to add more to it – but I would not recommend – because your page may load slowly because of that:
<div class="slide" style="background-image: url(https://photos.smugmug.com/Personal/USA/i-JFmTZTw/1/896059a4/4K/_DSF4877-4K.jpg);">
      </div>
CSS Code
Open the CSS tab within the HTML content block and add this code to it:
html {
  margin: 0;
  padding: 0;
  width: 100%;
  height: 100%;
}

.container {
  position: relative;
  overflow: hidden;
}

.container .slides {
  position: relative;
  height: 100vh;
}

.container .slides .slide {
  position: absolute;
  height: 100vh;
  width: 100%;
  left: 0;
  z-index: 1;
  background-size: cover;
  background-repeat: no-repeat;
  background-position: center center;
}


.container .slides .slide:nth-child(1) {
  -webkit-animation: slide1 25s linear infinite;
  animation: slide1 25s linear infinite;
}
.container .slides .slide:nth-child(2) {
  -webkit-animation: slide2 25s linear infinite;
  animation: slide2 25s linear infinite;
}

.container .slides .slide:nth-child(3) {
  -webkit-animation: slide3 25s linear infinite;
  animation: slide3 25s linear infinite;
}
.container .slides .slide:nth-child(4) {
  -webkit-animation: slide4 25s linear infinite;
  animation: slide4 25s linear infinite;
}
.container .slides .slide:nth-child(5) {
  -webkit-animation: slide5 25s linear infinite;
  animation: slide5 25s linear infinite;
}

@keyframes slide1 {
  12% {
    opacity: 1;
    z-index: 1;
  }
  16% {
    opacity: 0;
    z-index: 0;
  }
  17% {
    opacity: 0;
    z-index: 0;
  }
  87% {
    opacity: 0;
    z-index: 0;
  }
  92% {
    opacity: 0;
    z-index: 0;
  }
  100% {
    z-index: 1;
    opacity: 1;
  }
}
@keyframes slide2 {
  0% {
    opacity: 0;
    z-index: 0;
  }
  12% {
    opacity: 0;
    z-index: 0;
  }
  16% {
    opacity: 1;
    z-index: 1;
  }
  20% {
    opacity: 1;
    z-index: 1;
  }
  32% {
    opacity: 1;
    z-index: 1;
  }
  36% {
    opacity: 0;
    z-index: 0;
  }
  37% {
    opacity: 0;
    z-index: 0;
  }
  100% {
    opacity: 0;
    z-index: 0;
  }
}
@keyframes slide3 {
  0% {
    opacity: 0;
    z-index: 0;
  }
  32% {
    opacity: 0;
    z-index: 0;
  }
  36% {
    opacity: 1;
    z-index: 1;
  }
  40% {
    opacity: 1;
    z-index: 1;
  }
  52% {
    opacity: 1;
    z-index: 1;
  }
  56% {
    opacity: 0;
    z-index: 0;
  }
  57% {
    opacity: 0;
    z-index: 0;
  }
  100% {
    opacity: 0;
    z-index: 0;
  }
}
@keyframes slide4 {
  0% {
    opacity: 0;
    z-index: 0;
  }
  52% {
    opacity: 0;
    z-index: 0;
  }
  56% {
    opacity: 1;
    z-index: 1;
  }
  60% {
    opacity: 1;
    z-index: 1;
  }
  72% {
    opacity: 1;
    z-index: 1;
  }
  76% {
    opacity: 0;
    z-index: 0;
  }
  77% {
    opacity: 0;
    z-index: 0;
  }
  100% {
    opacity: 0;
    z-index: 0;
  }
}
@keyframes slide5 {
  0% {
    opacity: 0;
    z-index: 0;
  }
  72% {
    opacity: 0;
    z-index: 0;
  }
  76% {
    opacity: 1;
    z-index: 1;
  }
  80% {
    opacity: 1;
    z-index: 1;
  }
  92% {
    opacity: 1;
    z-index: 1;
  }
  100% {
    opacity: 0;
    z-index: 0;
  }
}

.progress-bar {
  position: absolute;
  top: 0;
  left: 0;
  z-index: 3;
  width: 100%;
  height: 5px;
  background: #0045d4; /*Change this colour to your own colour - this colour is for the preloader/progress bar that appears at the top of the slideshow*/
  -webkit-animation: processbar 25s ease infinite;
  animation: processbar 25s ease infinite;
}

@keyframes processbar {
  0%,
  16%,
  36%,
  56%,
  76%,
  100% {
    width: 0%;
    opacity: 0;
  }
  0%,
  20%,
  40%,
  60%,
  80% {
    width: 0%;
    opacity: 0.4;
  }
  12%,
  32%,
  52%,
  72%,
  92% {
    width: 100%;
    opacity: 1;
  }
  13%,
  33%,
  53%,
  73%,
  93% {
    width: 100%;
    opacity: 0.4;
  }
  14%,
  34%,
  54%,
  74%,
  94% {
    width: 100%;
    opacity: 0;
  }
}

@media only screen and (max-width: 768px) {
  .container .slides .slide .captions {
    max-width: 90%;
  }
}
The CSS code includes instructions on how to change the colour of the preloader/progress bar. Now just publish your changes and enjoy the slideshow.
TIP: You may want to remove the top/bottom/left/right margins from the HTML content block.
2 comments
Chris Needham
Hi Tomasz! How are you? I am giving my site a much needed cleaning and would like the homepage slideshow to have click-through capability. The images on your homepage are indeed click-through but I don’t see that it’s a slideshow. The slideshow is fed through a smart gallery.
Any help you can provide would be much appreciated.
Chris
tomasznowicki
Hey Chris. I have just updated the text on this tutorial because I have changed my homepage. The full screen slideshow is currently not clickable. You would need to modify the HTML code to make the slideshow images/divs an actual links.