How to Upload Photos and Videos to SmugMug with Folio
Upload files from Finder or Apple Photos, import entire folder structures, handle duplicates with skip or replace options, and track upload progress with detailed reports.
Folio gives you several ways to upload content to SmugMug — from picking individual files in Finder to importing directly from your Apple Photos library or uploading entire folder structures at once. This guide covers each method, plus how to skip duplicates and monitor progress.
Uploading Files to a Gallery
Select a gallery in the sidebar
In the sidebar, navigate to and select the gallery you want to upload to.
Click Upload in the toolbar
Click the Upload button in the toolbar to open the upload menu.
Choose Select Files...
From the upload menu, choose Select Files... to open a Finder window.
Pick your photos and videos
Select one or more photos or videos from Finder. You can hold Command to select multiple files or Shift to select a range.
Upload begins immediately
Once you confirm your selection, Folio starts uploading right away. You can continue browsing while the upload runs in the background.
Supported Formats
Folio supports a wide range of file types:
- Photos: JPEG, PNG, GIF, HEIC
- Videos: MP4, MOV, AVI, MKV, M4V, and more
- RAW files (requires SmugMug Source plan): NEF, CR2, CR3, ARW, DNG, and many more
- Sidecar files (Source plan): XMP, DOP, and others
File size limits: photos up to 500 MB, videos and RAW files up to 3 GB.
Importing from Photos Library
If your photos live in the Apple Photos app, you can import them directly without exporting first.

Select a gallery in the sidebar
Choose the destination gallery in the sidebar.
Click Upload in the toolbar
Click the Upload button in the toolbar.
Choose Import from Photos Library...
Select Import from Photos Library... from the upload menu. This opens the built-in Photos picker.
Browse and select photos
Browse your Photos library and select the images you want to upload.
Click Add to start uploading
Click Add to confirm your selection. Folio begins uploading the selected photos immediately.
Uploading a Folder
Folder uploads let you replicate an entire directory structure on SmugMug — subfolders become SmugMug folders, leaf folders become galleries, and the hierarchy is preserved.
Select a folder in the sidebar
Select the destination folder in the sidebar, or stay at the root level to upload to the top of your account.
Click Upload Folder in the toolbar
Click the Upload Folder button in the toolbar.
Choose a folder from your Mac
Select the folder you want to upload from Finder.
Review the upload plan
Folio scans the folder and builds an upload plan: subfolders map to SmugMug folders, leaf folders map to galleries, and the full hierarchy is preserved. Review the plan in the preview sheet to confirm everything looks right.
Click Start Upload
Click Start Upload to begin. Folio creates the folder structure on SmugMug and uploads all files.
SmugMug allows up to 7 levels of nested folders plus 1 gallery level. Any folders exceeding this depth are shown as "skipped" in the preview sheet.
Duplicate Handling
When uploading to a gallery that already contains images, Folio can handle duplicates automatically. Click the Upload button in the toolbar and hover over When Duplicate Found to choose one of three options:
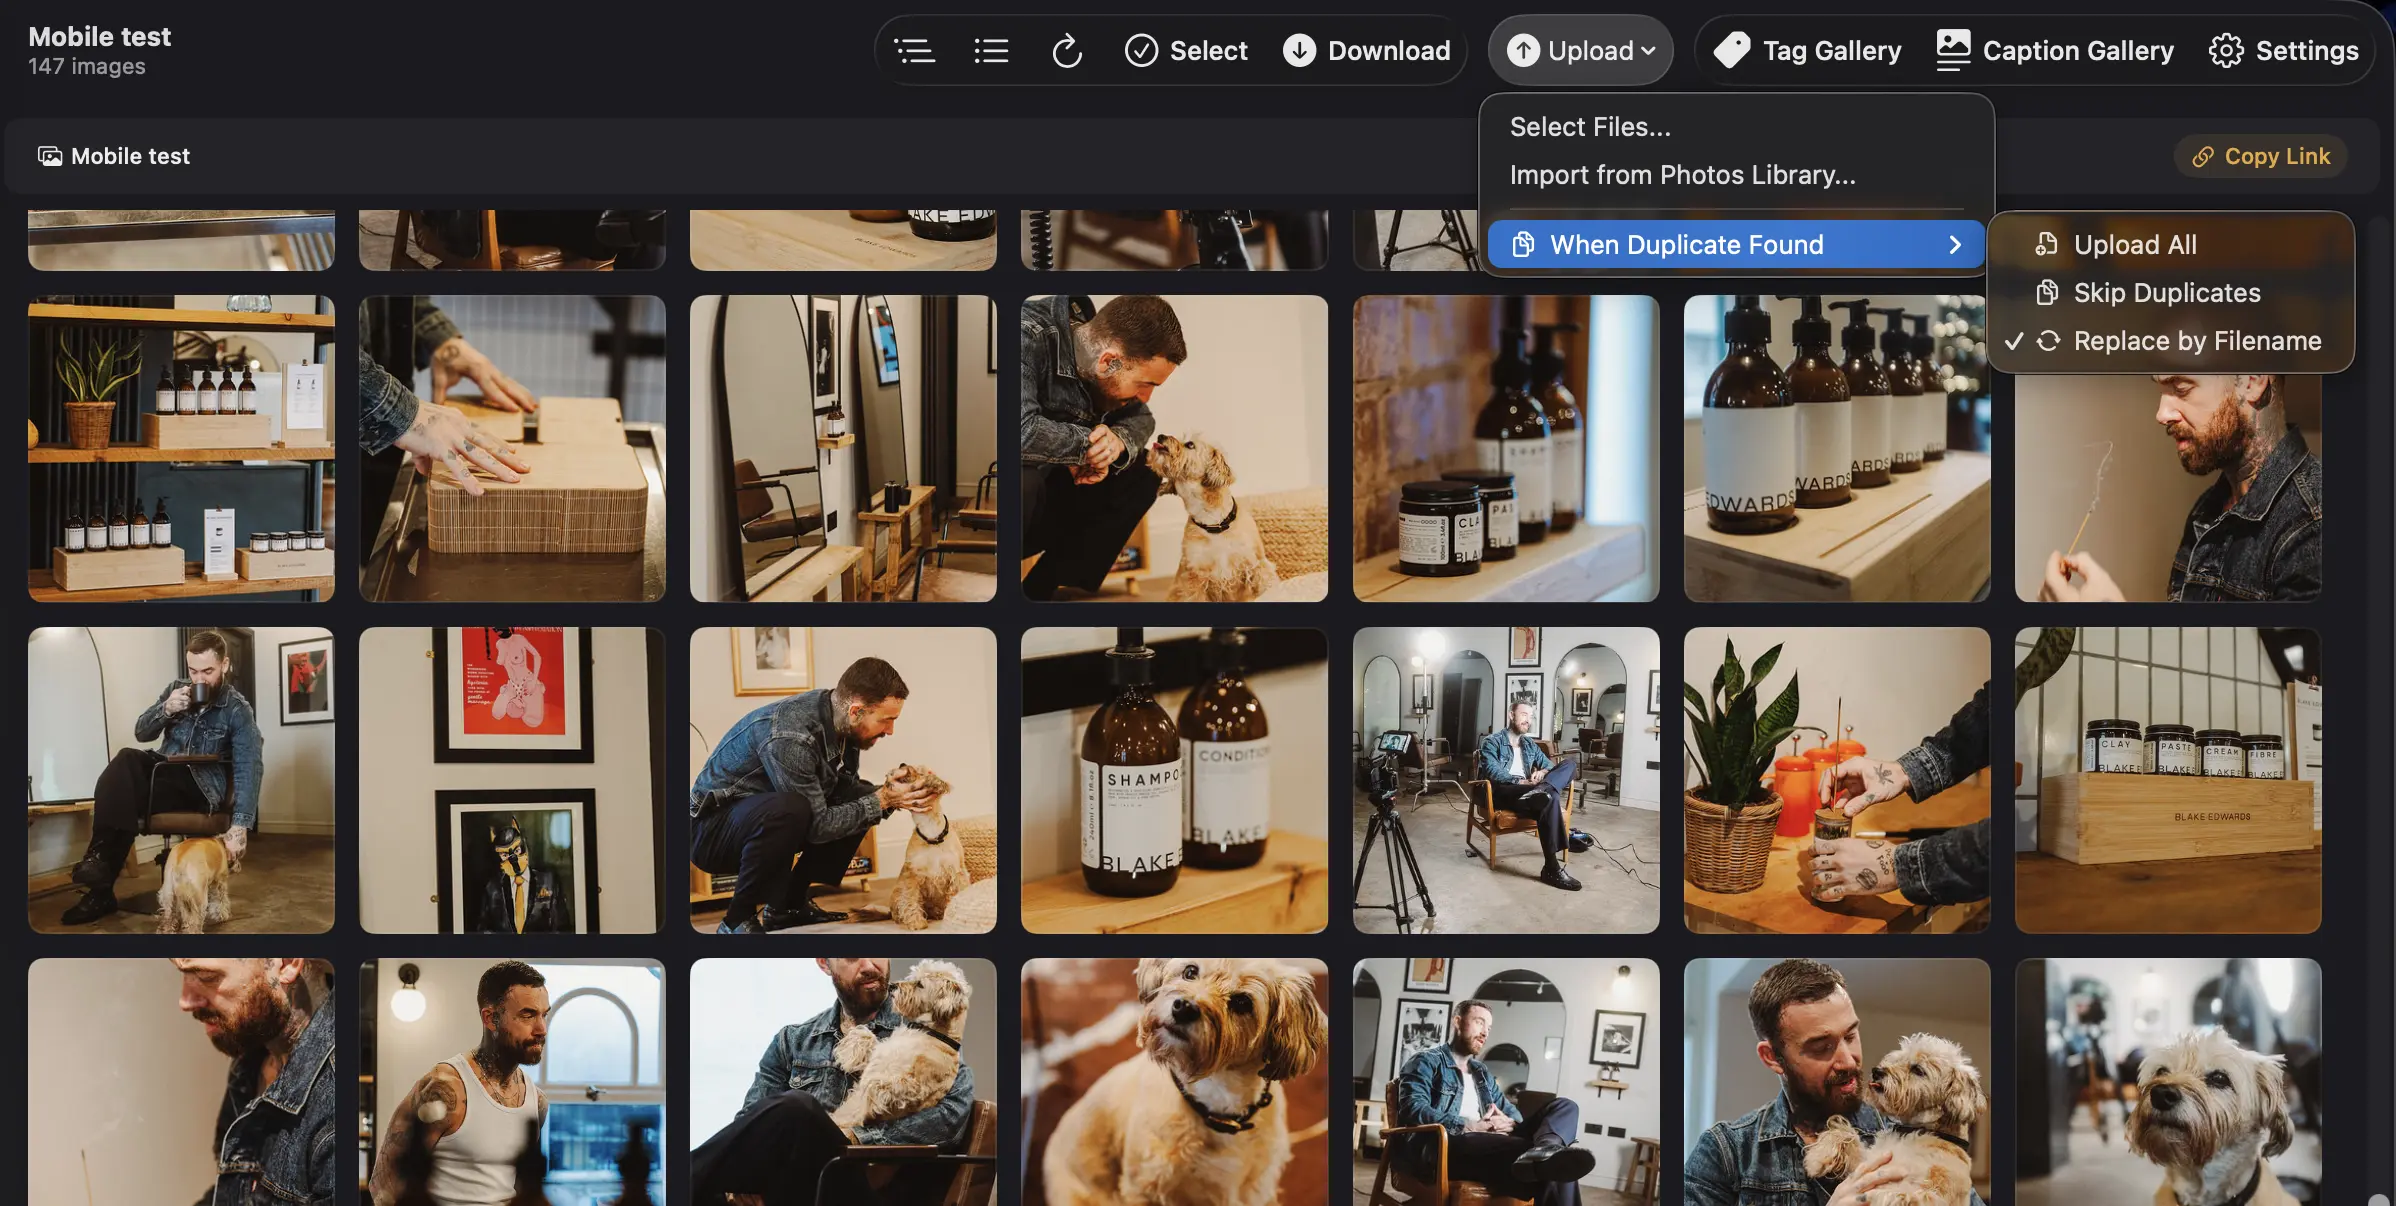
- Upload All — uploads every file regardless of whether it already exists in the gallery. This may create duplicate images.
- Skip Duplicates (default) — skips files that already exist in the gallery. Folio checks both filenames and checksums to detect duplicates accurately.
- Replace by Filename — replaces existing images when a file with the same name is uploaded. The original image is swapped out in-place, keeping the same position and URL in your gallery. Files with identical content (same checksum) are automatically skipped to save bandwidth.
Replacing an image is permanent — the original cannot be recovered from SmugMug. Folio will ask you to confirm the first time you use Replace by Filename.
If a gallery contains multiple images with the same filename, Folio plays it safe and uploads the file as a new copy instead of replacing any of them.
Your duplicate handling preference is remembered between sessions.
Upload Progress and Controls
While an upload is running, Folio shows:
- Current file name being uploaded
- File count (e.g., "12/50")
- Bytes transferred (e.g., "245 MB / 1.2 GB")
- Percentage complete
You can Pause, Resume, or Stop the upload at any time. For folder uploads, the progress also displays which gallery is currently being processed (e.g., "Gallery 3/12: Mountain Views").
Upload Report
When an upload finishes, Folio generates a detailed report showing:
- Total files uploaded, skipped, and failed
- File-by-file breakdown with status for each item
- Total size transferred and duration of the upload
- Failed files are expandable to reveal error details so you can troubleshoot and retry
Next Steps
- Learn how to organize your uploaded content in Managing Galleries
- Set up automatic uploads with Auto Upload
How to Download Photos and Videos from SmugMug with Folio
Download individual galleries, entire folders, or selected photos from SmugMug. Includes smart resume, progress tracking, and download reports.
Managing Galleries and Folders in Folio
Create galleries and folders, configure privacy and display settings, reorder photos with drag-and-drop, and move or delete images across your SmugMug library.