How to Add a Blog to Your SmugMug Website
Learn how to create a blog on your SmugMug site using folders and pages. No coding required — just content blocks and the built-in organizer.
SmugMug doesn't have a dedicated blogging feature, but you can create a fully functional blog using folders and pages. This approach keeps everything within your SmugMug site — no third-party platforms or custom code required.
What you'll create
By the end of this tutorial, you'll have:
- A Blog folder that displays all your posts as thumbnails
- Individual post pages with featured images, titles, and text content
- Optional comments to engage with your visitors
Prerequisites
Before starting, make sure you have:
- A SmugMug account on the Power, Portfolio, or Pro plan
- Access to your SmugMug site's Organizer
This tutorial requires the Power plan or higher. The Basic plan doesn't support the customization features needed to create a blog.
Create the blog folder
The blog folder will serve as your main blog page, displaying all your posts as a visual grid.
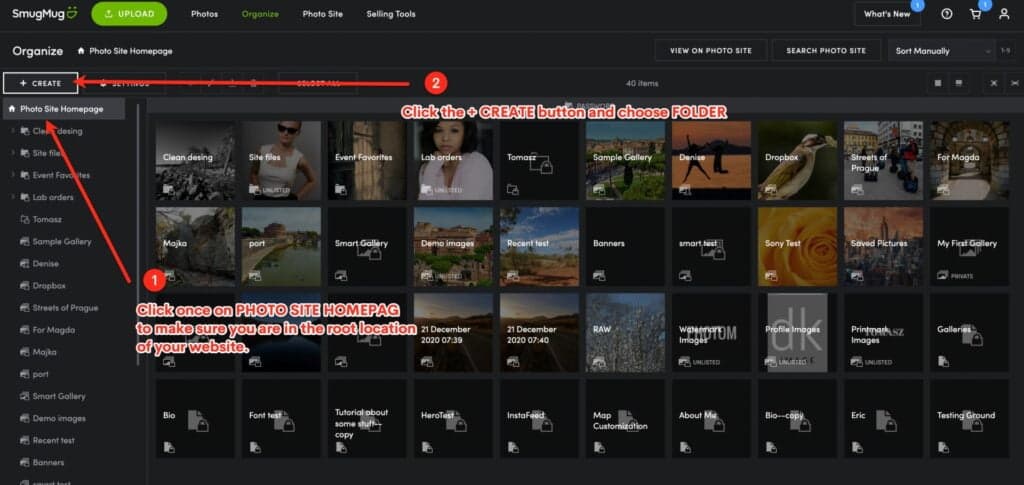
Open the Organizer
Log in to your SmugMug account and click on Organizer in the top navigation. Make sure you're in the Photo Site Homepage section — this is the root level of your website.
Create a new folder
Click the + Create button and select Folder from the dropdown menu.
Configure the folder settings
In the popup window, enter the following details:
- Name: Blog (or whatever you'd like to call it)
- Description: A brief description for SEO purposes
- Keywords: Relevant keywords for your blog content

Click Create to save your new folder.
Create your first blog post
Each blog post is a SmugMug page inside your Blog folder. You'll create a new page for every post you want to publish.
Navigate to your Blog folder
After creating the folder, you should already be inside it. If not, click on your Blog folder in the Organizer to open it.
Create a new page
Click the + Create button and select Web Page from the dropdown menu.
You'll be prompted to choose a layout. Select Custom to build your post layout from scratch, or choose Horizontal for a pre-built layout that works well for blog posts.
Configure the page settings
Enter the details for your blog post:
- Title: Your post headline
- Description: A summary of the post (appears in search results)
- Featured Image: The thumbnail that displays in your Blog folder
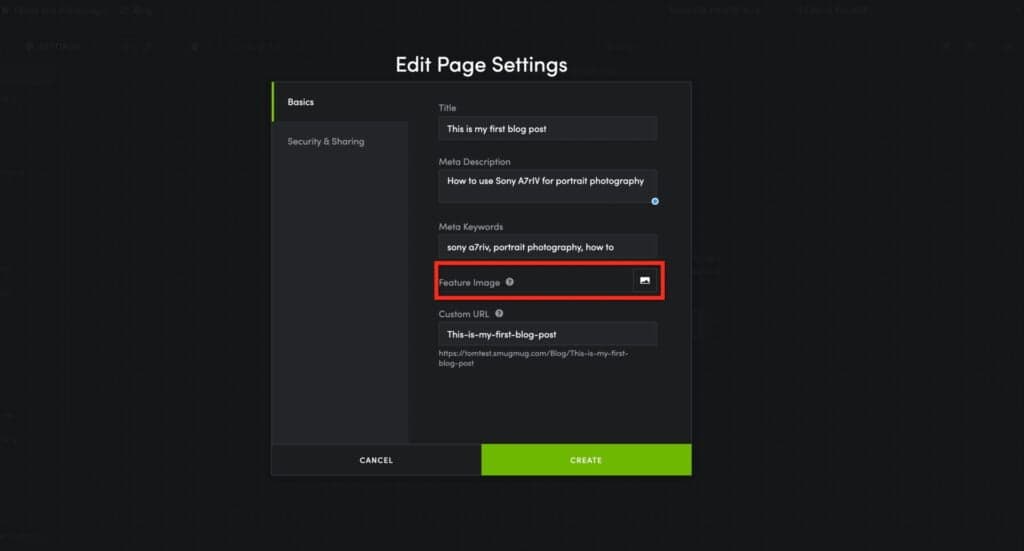
Add a featured image
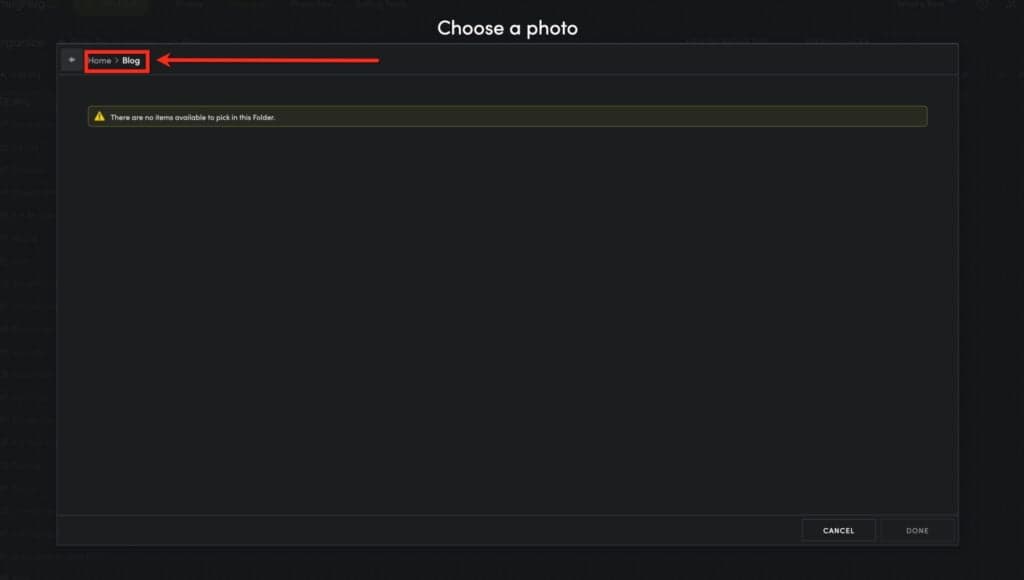
Click the image icon next to Featured Image to open the photo picker.
If you see a message saying "There are no items available to pick in this Folder," don't worry — pages can't contain photos directly. Click the home link in the breadcrumb navigation at the top of the photo picker to access your galleries.
Select an image and click Create to save your new post.
Design your post layout
After creating the page, click View This Page to see how it looks. Now you'll add content blocks to create your blog post layout.
Enter customization mode
Click Customize in the top right corner to start editing your page layout.
Add a featured image block
Open the Photos section in the content block panel on the right. Drag the Single Photo block onto your page, below the breadcrumb navigation.
Select the photo you want to display as your post's hero image.
Add a title block
Open the Text section and drag the Title block below your featured image. This automatically displays the page title you set earlier.
Add your post content
Drag a Text block below the title. This is where you'll write your blog post content.
Click on the text block to open the editor and write your post. You can format text, add links, and include additional images.
Optional: Add a comments section
If you want readers to leave comments, open the Social section and drag the Comments block below your text content.
Publish your changes
Click Done and then Publish to make your post live.
Styling tip: Consider turning off "Emphasize Current Page" in the breadcrumb block settings. This makes all breadcrumb links the same size for a cleaner look.
Customization ideas
Consistent post layouts
While SmugMug doesn't support page templates, you can speed up the process by:
- Creating a "template" post with your preferred layout
- Using it as a reference when building new posts
- Adding the same content blocks in the same order each time
Blog folder appearance
Your Blog folder automatically displays all pages as thumbnails using their featured images. You can customize the folder's appearance by:
- Adjusting the grid layout in folder settings
- Adding a header text block to introduce your blog
- Customizing the folder's theme and colors
SEO optimization
For better search visibility:
- Write descriptive titles that include relevant keywords
- Fill out the description field for each post
- Add keywords to both the folder and individual pages
- Use descriptive alt text when adding images to your posts
Limitations
This blog solution works well for most photographers, but there are some limitations to be aware of:
- No templates — You'll need to recreate the layout for each new post
- 5,000 post limit — Your Blog folder can contain up to 5,000 pages
- No categories or tags — SmugMug doesn't support post categorization (though you could create subfolders)
- No RSS feed — Readers can't subscribe to your blog via RSS
- No scheduled publishing — Posts go live immediately when published
Despite these limitations, many photographers find this approach sufficient for sharing behind-the-scenes content, client stories, and photography tips without needing a separate blogging platform.
Next steps
Now that you have a blog set up:
- Create your first real post — Share a recent session or photography tip
- Link to your blog — Add a navigation link in your site menu
- Promote your content — Share new posts on social media to drive traffic
How to Add an Accordion Block to Your SmugMug Site
Learn how to create an interactive accordion panel for your SmugMug site using HTML and CSS. Perfect for FAQs, service lists, and organizing content.
How to Change Buy Button Labels on SmugMug
Customize the text on SmugMug's buy buttons using CSS. Replace "Buy Photos" or "Buy Photo Package" with your own labels like "Shop Now" or "Buy Digital Package".